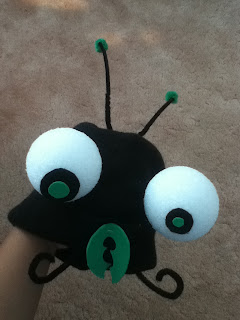
This is a very inexpensive way to knock out a quick and easy costume.
First the materials:
Green Foam
Orange Foam (or whatever color you have on hand that you think goes alright with green)
Styrofoam balls
Black Felt
Black Pipe Cleaners
Green Pom Poms
Black Beanie
Plastic Lid (like from a yogurt cup or something, but I used a lid from an old salsa container because J has a big head)
2 Long Screws
Safety Pin
Glue Gun

It was nice because I happened to have a black beanie in the back of my closet. There was a sale at Target one year and I picked it up for less than $5.
First think I did was set up the "antennas" using the pipe cleaners, plastic lid, pom poms, and beanie. I cut two slits in the plastic lid and threaded one pipe cleaner through both holes so it ends up looking like a U shape, an end of the pipe cleaner sticking out each slit. Then for good measure I gave the two ends a twist at the bottom so that they feel more sturdy. Next, I twisted one pipe cleaner each to the shorter ends of the first pipe cleaner so that there will be a long "antenna" look to it. Then I threaded each of those ends through the beanie at the top, where I imagined the "antenna" should go. After threading, I twisted the two separate pipe cleaners around each other again at the top of the beanie to make sure the had a sturdy base. Last step for the "antenna" is gluing the green pom poms onto the tips.

After the "antenna" I worked on the bugs "pincer". I just drew a shape of the pincer onto the green foam and cut it out.

After that came the eyes. I cut two pairs of cirlces. One pair from the black felt, which I made sure was larger than the second pair which I cut from the green foam. You can be creative with this so whatever shape and size you want it fine. I glued them onto the two Styrofoam balls using my glue gun.

Now comes the final assembly. I didn't want to damage the beanie just in case we wanted to use it after Halloween so I didn't glue things onto it but if you're more inclined to, you can always just glue the eyeballs and pincer on. I had J try on the beanie first so I could gauge where everything should be placed once his giant head stretched the beanie out. I attached the pincer with safety pins and then used screws to first thread through the beanie and then into the Styrofoam eyes to secure them in place. I had to have the eyes pointing down a little as I thought of what a child's view may be in a hospital bed. J wanted to add a little more character to the bug so he took a pipe cleaner and made a mustache for it.
The final result, ... TA DA!

I'll see if I can get J to take a pic with the beanie on when he gets home tonight.
J also wanted something for his torso. Initially, I was going to give him extra arms, like a proper bug, but we thought that this would get in the way of treating his patients so we settled on wings. I cut out two "wings" from the orange foam. I just drew an outline of what I though was a wing-ish shape. Then I cut some large circles out of the leftover green foam. When I put the circles down, it reminded me of a ladybug and I didn't want J to get teased so I asked him what he thought. After much deliberation, and tons of hemming and hawing, he finally said he wanted the wings to look like the made a smiley face. Our attempt at that made weird wings so We finally decided on two small bugs crawling on his wings. (Which in my opinion, made the wings NOT look like wings but whatever makes the mister happy- SHRUG).

As you can see, we just played around with our leftover materials and glued them in whatever way made sense to us to achieve J's goal. You can be creative and make your own wing design.
I'm pretty proud of my first ever effort at making a homemade Halloween costume. With THESE two hands! YAY! Maybe next year, I'll bust out the sewing machine. or... not... well... we'll see about that. err...
** I took a pic of J last night after blogging. For all you curious mind's out there, this is what a grown man looks like as a bug. He's totally hamming it up for his blog-viewing public** ;)


What??!! Adult male bug costumes are not the rage this year??!! NO WAY??!!! Haha, love the post! Love the blog!
ReplyDelete